How to Build Your Own Recording Studio
REACH OUT TO US
As we covered in our article about bands on a budget, money is usually tight for struggling musicians. The good news is that there are plenty of ways you can compensate, and they don’t have to involve eating Ramen noodles for weeks on end. One of the best (and most popular) ways for musicians on a limited budget to cut cost corners is to build a DIY recording studio. Since most musicians don’t double as carpenters, we’ve assembled some simple tips on how to build your own recording studio, and to gather the equipment you need to run it.
Especially since the advent of coronavirus, groups are looking for intimate and safe spaces to record, and if done right, your DIY studio can turn into a lot of extra income for you!
WHY DIY (DO-IT-YOURSELF)?

As you might already know from experience, professional recording studios can get expensive in a hurry. While costs vary, the typical rates for professional recording can be as “low” as $50 per hour and as high as $500 per hour, perhaps more if you live in a big city.
Even if you’re lucky enough to find a studio that offers low rates and high quality, you’re still apt to find yourself hemorrhaging cash as the hours add up. That might tempt you to rush through your recording sessions, which is obviously never a good thing – especially not when your career is just getting started.
Fortunately, you don’t have to let pro studios bleed your bank account to death. Instead, you can fashion a sturdy financial tourniquet by building your own recording studio at home. Yes, it will take a little bit of time and effort, but most musicians find the investment quickly pays for itself. Plus, just think of these other nifty benefits:
- Have an awesome idea for a song at three in the morning? Well, too bad, because the recording studio is closed… unless, that is, it’s in your own home. Then you’re free to jam out 24 hours a day, seven days a week, unfettered by other people’s schedules.
- Since this is your personal studio, you can dress it up and decorate it however you want. That might not sound like a big deal at first, but a studio is more than just an office or a dorm – it’s where you bring your dreams and passions to life. You want to be in the best possible mindset, surrounded by the images and objects that inspire you and get your creativity fired up.
- You’re not being charged by the hour, you can take as many tries as you want to get the very best results. You can also move at any pace you like, without having to worry about other people getting bored, tired, annoyed, impatient, etc.
- If you’re the shy type, going into a professional recording studio can be a nerve-wracking experience, to the point where stress and embarrassment can compromise the quality of a session. Recording from home can help you get used to the process while you build up the confidence you need to perform in front of others.
- Woke up late? Car broke down? Miserable weather outside? No sweat – everything you need is already right at your fingertips. You can’t beat a home studio for sheer convenience and flexibility.
From a psychological standpoint, recording on your own can be a really empowering experience. It might seem overwhelming at first, but you’ll pick up more and more as you continue through the process. Before you know it, you’ll have developed your own, signature sound.
Depending on your skill level, interests, and the way your studio is set up, you might eventually be able to charge other musicians to record.
Now here’s how to get it done.
STEPS TO BUILDING YOUR OWN MUSIC RECORDING STUDIO
Building your own recording studio takes some elbow grease, and chances are you’re not going to accomplish it all within a day – but hey, neither did the builders of Rome. Try not to get discouraged or lose motivation as you’re chipping away at construction. Remember, when you’re finished, you’ll have your own, personalized recording studio that you can access at any time of day or night, where you’ll be able to play to your heart’s content — without having to continually fork over cash to a recording studio.

Building:
CHOOSE A LOCATION
This is one of those things that’s so obvious people forget to even consider it, but think about where you can put your studio. You’re going to be spending a lot of time there, so it should be somewhere convenient, accessible, and as enjoyable as possible. If your basement creeps you out, or you don’t like the way the guest room always smells, either make the space palatable for yourself or put your studio somewhere else. You’re simply shooting yourself in the foot by setting up a studio you know you’ll be hesitant to use.
While there’s no “right” or “wrong” size for an at-home recording studio, what works for one artist may be a poor fit for another. For example, an eight-person band is going to need a heck of a lot more space than a DJ. Here are some points to consider when selecting a set-up area:
- Give yourself more space than you think you need. This will allow you to comfortably accommodate new equipment, instruments, and band members.
- Try to choose the quietest area in your home or apartment. Interior rooms are generally superior to exterior rooms in terms of noise, especially if you live near a highway or bus stop.
- Interior rooms are better than exterior ones due to daily flux in temperature and humidity throughout the day and evening. Taking into consideration the climate you live in also furthers the incentive for choosing a room that does not have an exterior wall to the outdoors.
The ideal space will have a high ceiling and irregular walls/surfaces, though this isn’t necessarily mandatory. (While you can’t cheat a ceiling, you can help to create irregular surfaces by bringing some furniture into the room, like a dresser or a folding screen.)
SEAL THE CRACKS
Unless it’s contained as tightly as possible, sound has a way of leaking all over the place. This can be disruptive to neighbors and detrimental to the quality of your music, both of which are issues you want to avoid. Keep in mind that most communities have local noise ordinances, and if you annoy your neighbors once too often, they might decide to call the cops on you. Depending on the circumstances, they could even try to sue you.
To minimize these unpleasant effects, you need to make sure your studio is as tightly packed and plugged as you possibly can. If you don’t want to spring to have an entirely new door installed, you can sidestep the issue by sealing open space with cheap sealing strips. Sealing strips are made out of materials like vinyl, foam, and rubber, and can be purchased at just about any hardware store (or online).
To give just one example of the many options you can choose between, a company called Audimute sells 25 foot long rolls for about $25 each. One roll is enough to treat about eight doors, so you should be more than covered (with some spare material left if you make a mistake).
VENTILATE AND COVER
Considering that a recording studio is a closed environment where all the acoustically leaky gaps, cracks, and holes are patched and plugged, you need to somehow allow for sufficient oxygen to breathe. Toward that end, it’s time to install some ventilation.
At the most basic level, you can make what’s called an acoustic box. Here’s how:
- Step 1 – Build a box out of MDF. (MDF stands for Medium Density Fibreboard, and can be purchased in sheets of varying size and thickness from retailers like Lowe’s and Home Depot.)
- Step 2 – Insert an S-shaped duct to allow for airflow.
- Step 3 – Pad the rest with acoustic foam.
Now you’ll be able to… y’know, breathe.
ELEVATE THE FLOORS
The main purpose behind elevating the floors is to ensure that noisy, distracting vibrations won’t interfere with the purity of your recording. To create elevated floors in the simplest way possible, you can simply lie wood across foam blocks. Make sure the wood is securely rested upon the foam blocks to prevent instability and wobbliness. If the floor isn’t level, which is often the case in old homes from the 1800s, you might need to trim down some of the blocks to compensate. Just go slow so you don’t accidentally cut yourself.
DIFFUSE THE SOUND
Depending on the materials the walls were built with, you may not be happy with the way your music sounds when it bounces off the studio’s surfaces. To get an idea of this principle, think of how differently sound carries in an echoing warehouse versus a cozy, intimate room. As you can imagine, it’s likely that you’re going to want to diffuse the sound.
One easy way to help “soften” the sound quality is simply to add objects to the room, like a sofa, beanbag, and/or pillows. That will help cut down on the “echo chamber” effect of a barren space. Additionally, you can cover your walls with mineral wool insulation, or pick up a product like Pro-Foam.
Versare offers professional studio audio foam at a premium, and you can spring for that if you want, but a quick search on google will bring up dozens of affordable audio foam in various sizes, audio dampening patterns, and thicknesses.
Having carpeted floors also helps to diffuse sound. Just be wary of a few facts:
- Carpet doesn’t absorb low-frequency sounds.
- Carpet will quickly wear out under chairs and in areas with heavy foot-traffic.
- Try getting a bright or pale carpet that will contrast sharply with black wires and cables. This will reduce the risk of accidentally tripping and hurting yourself. (Toward that end, you should also pick up some cheap cable ties.)
EQUIPMENT:
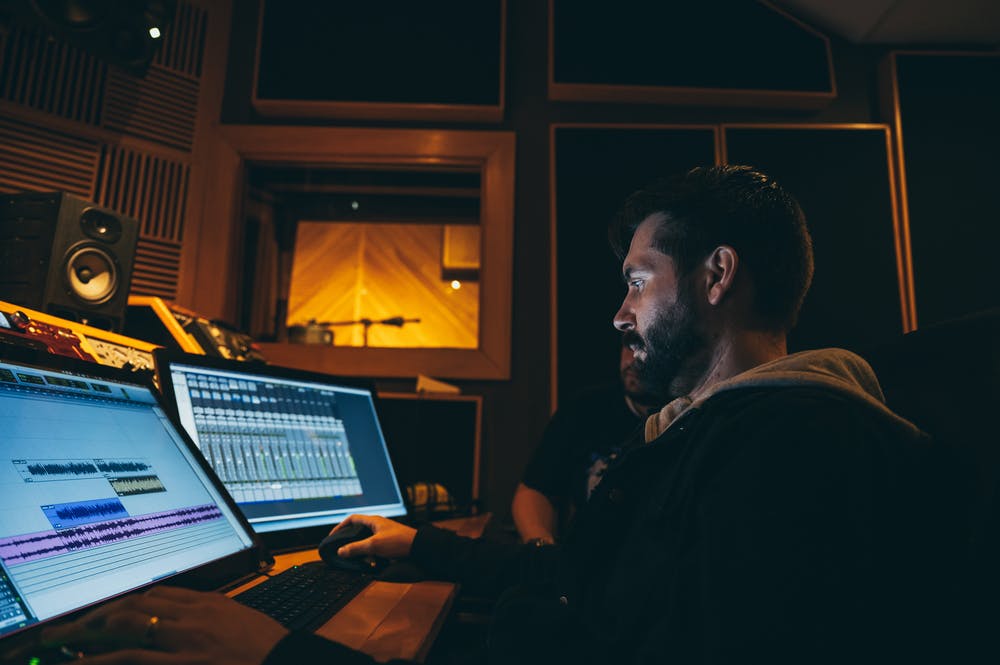
MAKE SURE YOU HAVE A GOOD COMPUTER
Recording, editing, mixing, saving, and printing audio files takes a lot of processing power, so make sure you have a newer, fast, computer. Ideally, you will buy a new computer dedicated solely to recording, but if you aren’t at that level yet a new Apple or Microsoft laptop or computer will be good enough.
The heartache caused by buggy or aging hardware knows no bounds, and it’s best to avoid the trouble altogether before you start putting in hours of work.

PICK YOUR RECORDING SOFTWARE
Obviously, you’re not playing to a live audience when you’re in the studio – you’re recording. Therefore, you’ll need the assistance of recording software (also known as a Digital Audio Workstation— DAW for short). There are multiple software options, but two of the most popular are called ProTools, Ableton Live, and ProTools little sibling GarageBand.
While ProTools is professional studio-grade and therefore expensive, it is probably the most accessible, learnable, user-friendly DAW on the market. You have the ability to create high-quality mixes with pro-plug-ins for compassion, gain scheduling, reverb, and more.
It runs as a subscription service, starting at $29.99 per month for 12 months, $34.99 per month on a month-to-month basis, and $299.00 upfront for a whole year. It really is worth it if you’re super serious about creating the highest quality recordings in any genre from classical to metal to EDM.
Ableton has a different interface and is more suited to those who want to make electronic, dance, and/or experimental music. You can achieve fine recordings with it, but it doesn’t have the flexibility ProTools or Garageband have by their very design and interface. It is a $359 one-time purchase for Ableton Live 10 Standard, and there are higher and lower packages with other price-points.
Finally, if you’re just getting started and have a MacBook, you can teach yourself how to record using ProTool’s little sibling GarageBand. It comes for free on every Mac laptop. ProTools and Garageband look almost identical, have the same interface, and function in much the same way— GarageBand just doesn’t have every bell and whistle its older sibling does.
The more you’re willing to pay, the more features and flexibility you’ll get – but at the same time, you may not actually need all those fancy (and pricey) bells and whistles at this stage in your career. Do your research, and choose the software that seems best-suited to you.
(About autotune): This, now must-have digital plug-in tool is not freely included in any DAW or package of plug-ins, believe it or not, and must be bought and paid for with a monthly subscription from the Autotune company themselves. I know.
“Of course,” you’ll tell yourself, “We don’t need autotune, we don’t play that kind of music.” Or, “We would never use it so we would never need it.”
Let me tell you, even if you don’t use it for yourself. Yea you need it, and yea you should have it. Never get caught without a coat in the rain, ya dig? What if that high paying new client comes over and you don’t have what they need day of? Not a good look for the studio.
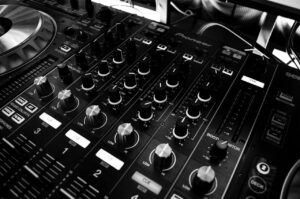
INSTALL AN AUDIO INTERFACE
While you can buy a USB mic and make nice demos with your DAW, you’re going to want an audio interface so you can plug your high-quality XLR microphones directly into your DAW. The audio interface changes the electrical signal in your microphone cable into a digital signal your DAW can understand. A quick Amazon search brings up many affordable and expensive options, such as the ProSonus AudioBox, which has been popular for twenty-five years.
FULL EQUIPMENT LIST
Instruments aren’t the only pieces of gear a musician needs (though they’re probably the most fun). If you’re at the stage where you’re looking into building a recording studio, you may already be fully equipped – but just in case you aren’t, some important items to have for your studio include:
- Headphones – Look for pro-grade musician headphones, not tinny, leaky consumer earbuds. This is one place where you don’t want to skimp. The more they look like huge, honking “cans” the better. Amazon will bring you dozens of results.
- Microphones – Condenser microphones and dynamic microphones are your best options. See our article here to compare different types of microphones.
- Monitor Speakers – Not to be confused with stereo speakers. Monitor speakers are designed to handle all the frequencies that usually get lost between the studio and your radio or home speaker. You’ll need this level of definition to properly EQ and mix tracks. Half the battle is sussing through stubborn frequencies and removing them.
- Interface – Unlike a PA or an amplifier system, you can’t just plug microphone cables into a computer, so you need to get a competent interface, one that takes at least two XLR jacks. This is how you’ll get screaming electric guitar amps, or vocals, or keyboard into your computer. For drums, you will probably need a little better and more expensive interface, so you can use more than two microphones at once (but hey, you can get that Neil Young drum sound with two, so maybe you can get away with it).
- Computer Monitor(s) – When recording music, you sometimes bounce back and forth between different windows in your monitor, and for this reason, most engineers like to have at least one, and usually two, very large monitors. Think about it, you’re gonna be working like a dog, staring at this screen for ten hours a day sometimes, give your eyes, and your poor brain, a break by making it easy see. Two monitors makes life even easier, because you can have your DAW session up in one monitor while you fiddle with your plugin collection and dial everything in and make it sound just right. Less clicking and less eye strain is a very, very beautiful thing on day three of ten hour days making a demo or a full length record.
- DAW – The different Digital Audio Workstations all are a little better for different sort of musicians, but when it comes to professional engineers, almost 99.9% of everyone works in ProTools or Logic, protools being more common. These mostly intuitive programs take a little time and maybe some online lessons to get going, but once you learn the shortcuts, and the ins and outs, this software will have you making pro studio quality music in no time when paired with the right hardware.
Building your own home recording studio isn’t always quick, and it isn’t always easy. But with a little patience, a few YouTube tutorials, and possibly some trial-and-error, you’ll be well on your way to enjoying a recording studio that’s open around the clock – and that can eventually pay for itself.
While we at Planetary Group can’t build your home studio for you, we can help you promote your home-studio-recorded demo! If you’re looking to get your career off the ground, our promo team would love to hear from you. Call Planetary Group at (323) 952-5050 to talk about your goals.